Modern seed carts rely on accurate weight readings to keep planting efficient and consistent. The Intercomp LD820 scale system is designed to make loading planters simple, accurate, and repeatable. Once you understand a few key functions, the system becomes incredibly easy to operate.
This guide walks through the basics of operating your Intercomp scale, setting up Auto Dispense, calibrating the system, and troubleshooting common issues so you can stay focused on planting.
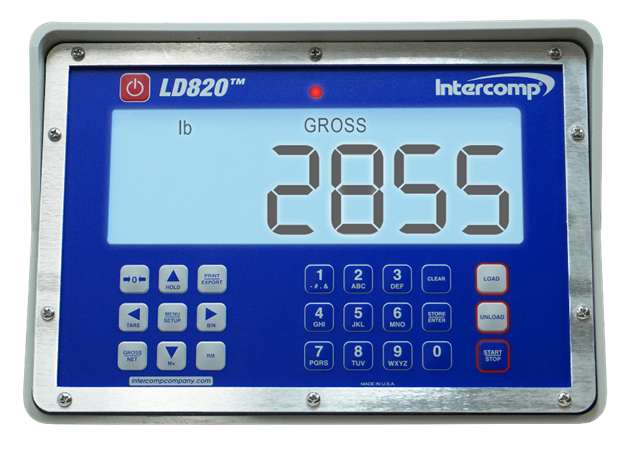
Before setting up advanced features, it’s important to understand the core controls you’ll use every day.
Hold the ZERO button for about two seconds to zero the scale. This resets the displayed weight but does not clear the tare value.
Gross / Net
The Gross/Net button toggles between the full weight on the scale and the net weight after tare has been applied.
Tare Button
Press Tare to reset the tare value.
Press Tare + Clear together to completely clear tare.
These three buttons handle most day-to-day weighing tasks.
To ensure accurate readings after installation or service, perform a field calibration.
Load the cart to 25–50% of expected capacity.
Enter Code 0031 to begin field calibration.
Enter the current displayed weight.
Enter the certified known weight.
The system automatically adjusts calibration.
Once calibrated, record the Field Calibration Factor (Code 0030) so the system can be quickly reset in the future if needed.
Two settings can help fine-tune scale performance.
The LD820 updates weight readings 10 times per second. The default average rate smooths readings over about 3 seconds.
Increasing the average rate can provide a more stable reading if weight fluctuations occur while loading.
Controls the weight increment displayed on the screen.
Recommended settings:
2 lb increments
5 lb increments, depending on your application.
The LD820 also allows you to track the weight of individual bins or Pro Boxes.
Enter Code 1020.
Select BINS.
Enter the number of bins you want to track.
You can track up to 10 bins.
Using Bin Mode
Press the BIN button to toggle between bins.
The display will show bin number and bin weight.
You can enter bin weight in two ways:
Add the bin to the scale.
Manually enter the weight by holding the BIN button until dashed lines appear.
Note: The ZERO button will not function while viewing bin weight.
The LD820 can automatically split seed between multiple rows or tanks.
To use Split Unload:
Press the RM button.
Enter the total weight to distribute.
Enter the number of rows or tanks.
The scale calculates the correct unload weight per container.
Use the wireless remote to start unloading.
This feature is especially useful for central fill planters or evenly distributing seed across multiple boxes.
Auto Dispense allows the scale to automatically shut off the auger once a target weight is reached. This makes filling planter boxes or tanks quick and consistent.
Two key settings control this system:
The target weight you want to unload.
The weight adjustment is used to account for seed still traveling through the auger tube after the auger shuts off.
Press the Unload button.
Enter the target dispense weight.
Press Store/Enter.
Enter the PREACT weight.
Press Store/Enter again to enter Dispense Ready Mode.
When the system is ready, UNLOAD will appear at the top of the display.
Once the system is in Dispense Ready Mode:
Use the HitchDoc wireless controller.
Press AUG OFF, then AUG ON to begin dispensing.
A red annunciator light will illuminate while dispensing.
When the PREACT weight is reached, the auger automatically shuts off.
The display returns to Dispense Ready Mode so you can start the next fill.
To stop dispensing early, press Start/Stop.
To exit ready mode, press Clear twice.
If you notice boxes are slightly overfilled or underfilled, adjust the PREACT weight.
Example:
PREACT setting = 25 lbs
Overfill = 10 lbs
New PREACT setting:
25 + 10 = 35 lbs
This adjustment compensates for seed still moving through the auger after shutoff.
If the display shows LC Err, the issue may be related to a load cell or wiring.
Quick diagnostic steps:
Unplug load cells one at a time until the error clears.
Inspect cables for cuts, kinks, or damage.
Check connectors for moisture or loose wiring.
If the error persists, contact Intercomp service for further diagnostics.
Need Service or Support?
If you need assistance, Intercomp’s support team can help.
Intercomp Service
Phone: 763-476-2531
Email: customerservice@intercompcompany.com
When contacting support, be ready to provide:
Business name and contact information
Product description
Intercomp part numbers
Serial numbers, if available
